Wednesday, June 11, 2014

Use Adobe Illustrator to Create a Clean Website Layout

Layout

This tutorial is perfect for the beginning to intermediate Adobe Illustrator users. We'll cover how to layout a website and prepare it for use on the web. Also, we'll use the recently released Website Elements Freebie to mock up the design as well.
Start a New document with a width of 960px and a height of your choosing. I've chosen this width because this website will likely incur internet traffic who have average to large monitors. A width of 960 pixels is a safe size that will favor the majority of visitors. Last, set your Color Mode to RGB.
The black border shows the document size (called the Artboard) that we created. I like to place a blank screenshot of a browser window on its own layer while I'm designing, to get a good idea of what my website will look like when it's done.
This next step is very important. Make sure you are aware of what zoom you're viewing the document at. When all is said and done, your website will be seen at 100%. Feel free to zoom in and out while working on your layout, but be certain all your text and design elements are readable when viewed at 100%. Use the drop down highlighted below (or simply type in the percentage you want) to change the zoom to.
Sidenote: sometimes Adobe Illustrator gets testy and doesn't show the numbers as you type them into the zoom area highlighted below. For example, if you type 58% sometimes the numbers don't change as you're typing. If this is the case, simply press return after you enter your values, and your document will be resized to the number you entered.
The Artboard can be toggled between visible and invisible by going to View > Hide Artboard. The problem with this is that it takes a little longer than showing and hiding guides (Command + Semicolon Key) So, I find it best to use guides and hide the Artboard. Over the course of laying out a whole website you will find it much easier to press a quick key command rather than going to the top of the screen and selecting from a list every time.
You may find it easy to establish balance and a nice hierarchy by first drawing simple grey boxes on your page. The thin rectangles represent where I plan on using text while the large grey boxes will be images.
After you have a general idea of what the layout will look like you can add guides and remove the grey boxes.
Using only the guides as a reference, add other elements like navigation, text, and tighten-up where the logo, images ,and icons will go. It is helpful to toggle your guides on and off (Command + Semicolon Key), while you are finessing the layout. If the guides you drew don't work as well as you thought, definitely adjust them as you see fit.
Sidenote: when you toggle guides on and off they automatically become locked. You cannot move locked guides. To unlock guides quickly press Command + Option + Semicolon.
Continue finalizing your header with images, icons, and graphics.
Below I've decided to add a light blue color to enhance the header.
Add styling to your text, making sure to decide what links and headings will look like. I find it much easier and faster to accomplish as many design elements inside Illustrator so I can concentrate on programming and coding the website when the time comes.
There are a couple different ways to prepare a design for use inside a WYSIWYG (What You See is What You Get) editor, like Adobe Dreamweaver. The first method is using slices. Slices can be made using guides or a selection. To use guides to make slices first drag guides onto your page around each object that will require its own link. For example, an icon that, when clicked, goes to a specific page. Below I have four icons, each icon will lead the visitor to a different web page or area of the site.
I have drawn guides between each icon and just outside of the blue area. It is usually cleaner if you draw your guides about 1 or 2 pixels outside of the area that you are slicing. This ensures none of your artwork will be cut off.
Sidenote: Do not draw guides over your entire layout at once. Instead, do sections one at a time. For example, first do the header area. Clear all of your guides by going to View > Guides > Clear Guides. Save your slices for the web (discussed in a later step) and repeat this process for other areas of the layout.
Once you have your guides drawn the next step is to make slices out of them. To make slices from your guides go to Object > Slice > Create from Guides. On occasion, Illustrator may not make slices the first time you attempt to. I have found that I sometimes need to repeat this step three or four times before Illustrator actually will make slices. Below, the black numbered boxes indicate that the slices have been made.
To save your slices for use on a website go to File > Save for Web & Devices... Use the Slice Select Tool (K) highlighted in the upper left corner to select the specific slices that you want to save. Select multiple slices at once by holding down shift. Adjust the settings on the right to suit your needs. JPEG images work best for items that have several colors, while the GIF file format works well for items that have large areas of color and not many colors in general, PNG file format works well for transparent graphics (though may require some work to adjust for older IE browsers). You may want to test quality versus file type and adjust the Quality to save bandwidth. Once your ready, click Save.
Decide where you want to save the images to. I've chosen the Desktop. Under format select Images Only, then click Save.
On your Desktop you will now have a folder called Images. Inside this folder will be the specific slices (images) you selected. These images are ideal in resolution and file size for use on the web.
Clear your guides by going to View > Guides > Clear Guides. Now, draw new guides around the next area that you want to slice. The hover state (when the mouse is over the navigation) will be red, while the off state will be grey. You will need to make both versions of the navigation. To efficiently accomplish this, first make all of your navigation red then go to File > Save for Web & Devices...
Select the specific slices you want to save. Since my navigation is not made up of images or an abundance of colors I have decided the best file type for the navigation will be GIF, then click Save. Also, note that if your user a web supported font, then you may decide to use html text instead of images.
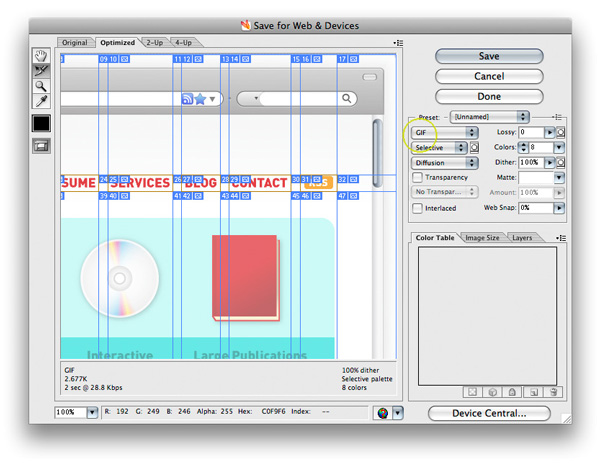
You can give your images a new name at this point. However, they are automatically named for you so this is not mandatory.
If you saved your images to the same location as before, you will notice the Images folder on your Desktop now includes the additional images you just saved.
Keep in mind this is just one possible workflow. Alternatively, you could place on and off states somewhere in your document, create all your slices, and export them together.
The other method of creating slices is by selecting an object then going to Object > Slice > Create from Selection. Creating slices using guides or from a selection is fine as well. Use a workflow that you find comfortable and best for the particular project you're working on.
On occasion you will not need to include the text that falls within a slice. For example, the footer will have text that is typed inside of the WYSIWYG editor. If this is the case simply delete the text before or after you make the slices, but previous to saving the slices for the web.
Below you'll notice that I deleted the text after the slices were made.
Observe the final website. As you can see, laying out a website in Adobe Illustrator is simple and effective. You can quickly experiment with design and give this phase of the web design process the attention and thought it needs. You can view the final image below or view a larger version here.

Adobe Illustrator CC for web designers

When I started working for a web agency in 1999, my team was already using Photoshop to design web pages. Back then, the introduction of the History palette and multiple undo was a big step forward at a time when web designers used tables to lay out web pages with cells filled by bitmaps and text blocks. Animated GIF was hot. We were dancing with hamsters, and web designers had six CSS properties available to them.
Today, web designers have more than 300 CSS properties to use. Time moves fast, and trends in web design have expanded to include mobile first, flat design, responsive web design, vector graphics, and icon fonts, to name a few. New techniques are available to express your creativity on a web page and deliver the right messaging. As the web evolves, I meet more and more web designers who use Adobe Illustrator CC in their web design workflow. The majority use Illustrator to create vector graphics and export them to SVG files. More web designers have started designing web pages directly in Illustrator CC because it provides a pixel-perfect design environment, scalable components, CSS generation, SVG export, wireframing, and reusable symbols.

Work in a pixel-perfect environment

The pixel alignment feature in Illustrator CC enables you to create and export crisp, clean graphics. When you create a new Illustrator document, you can select the Web profile. In the advanced options of the New Document panel, make sure the Align New Objects To Pixel Grid option is enabled. When you enable the pixel-aligned property for an object, the horizontal and vertical segments in the object align to the pixel grid to provide a crisp appearance of strokes. If you plan to export bitmaps at some point from your design, you may want to preview your vector graphics to see how they will be rendered. Choose View > Pixel Preview to see how Illustrator divides objects into individual pixels (see Figure 1).
fig01
Figure 1. Pixel Preview shows how Illustrator CC divides objects into pixels.
One of my favorite features is the new Transform panel. The classic Illustrator tools enable me to move, rotate, and scale graphics on the artboard. I can then use the Transform panel to make the graphics pixel-precise. The alignment tools enable me to click-align a set of objects and center them on my page (see Figure 2).
fig02a
fig02b
Figure 2. Transform and Align tools for pixel-perfect designs

Reuse your work

The modular architecture of Illustrator CC includes an interface to create reusable symbols and styles. Social media buttons, for example, are a common component in today's web design projects. To create a symbol, select a graphic in your design, open the Symbols panel, and click the New icon to add your creation to the Symbols library and use it in multiple projects (see Figure 3).
fig03
Figure 3. Save graphics to the Symbols library.
If you have multiple instances of a symbol on your page, you can edit the original symbol, by changing some colors for instance, and Illustrator pushes the modifications to all of your web pages (see Video 1).
Video 1. Modify symbol properties once and propagate the changes across your design (no audio).
You can also use the Character Styles panel to define CSS styles. When you set a font-family, a text size, and a color for a text block, you can select the text and click New in the Character Styles panel to create a style that you can apply to other text blocks on your web pages. If you edit the properties of the style (switching to another font-family for instance), the change is automatically reflected on all of your pages (see Figure 4).
fig04
Figure 4. Define character styles to use across your designs.

Create smart symbols with 9-slice scaling

9-slice scaling is a good way to define symbols to scale appropriately on your web page. For example, I want to design a banner graphic that contains title text and scales well whether the title is short or long. Usually, I design web pages with Lorem Ipsum because I do not have all the final content before I need to start creating my design. So my proposal might include a short title (see Figure 5).
fig05
Figure 5. A banner graphic with a short title
Later in the project, I might receive the final title for this section, which is much longer than what I used in my comp. When I scale horizontally, the banner creates unwanted distortion on the edges (see Figure 6).
fig06
Figure 6. Before 9-slice scaling is applied, the banner graphic distorts as it expands.
To enable 9-slice scaling and create scalable symbols:
  1. Select your graphic.
  2. Choose Window > Symbol to open the Symbol panel and click New Symbol to create a symbol based on your selection (see Figure 7).
fig07
Figure 7. Symbol options
  1. Select the Enable Guides For 9-Slice Scaling option.
  2. Double-click the symbol to edit it.
  3. Manually adjust the guides to exclude the areas you don't want to scale (see Figure 8).
fig08
Figure 8. 9-slice scaling gridlines
Now you can horizontally scale this symbol without affecting the edges (see Video 2).
Video 2. Demonstration of 9-slice scaling (no audio)

Design directly with web fonts

If you are a Creative Cloud member, your membership includes the Typekit Portfolio plan, which provides access to hundreds of professional web fonts hosted by Typekit. You can also put them on your desktop, where you can use them like any other system font in all of your desktop applications. Once they are synced to your desktop, you can use Typekit fonts in Illustrator CC as part of a web-safe workflow (see Figure 9).
fig09
Figure 9. Creative Cloud Typekit font integration
To make a font from Typekit available for desktop sync:
  1. Open the Creative Cloud desktop application and select the Fonts tab.
  2. Click Browse Fonts On Typekit to open the Typekit repository of web fonts.
  3. Select the Desktop filter.
  4. Choose a font and choose Use Fonts > On My Desktop to automatically sync the font to your computer.
The fonts you download, such as Proxima Nova or Coquette, will be accessible from the font menu in Illustrator CC.
For more information, check out my article entitled Using Typekit fonts to perfect web designs, which describes how to create a web-safe workflow with Photoshop CC and Typekit. You can apply this workflow to Illustrator CC, too.

Extract CSS properties

Illustrator CC can decrease the time you spend developing web projects by automatically analyzing your design and extracting CSS properties. If you define character styles for example, Illustrator can convert your styles to CSS. To extract CSS based on a character style, open the CSS Properties panel and select a style to generate the CSS (see Figure 10).
Note: You may want to name your character styles based on traditional web elements such as h1, h2, h3, and body.
fig10
Figure 10. Generate CSS from defined character styles.
You can also generate CSS from vector graphics by selecting a shape and naming its layer. Again, the CSS code automatically appears in the CSS Properties panel. The CSS export feature is incredibly useful. It works with gradient-filled objects, and it can generate the code for the vendor prefixes in the CSS export options (see Video 3).
Video 3. Create a gradient in Illustrator CC and generate its CSS (no audio).
CSS export includes the background color of your shapes, gradients, strokes, and even drop shadows (see Figure 11).
fig11
Figure 11. Export the CSS properties of your designs.

Generate images from your layers

The CSS Properties panel extracts the CSS properties for each individual element you select in Illustrator, but it can also generate a global CSS style sheet and the image assets of your page. Once your web design is ready, select all and click Export Selected CSS to generate a global CSS file as well as image assets in PNG format. From here, you just have to create the HTML skeleton of your page and import the CSS file to have a working web prototype (see Video 4).
Video 4. Generate the CSS and image assets for your web design prototype (no audio).
David Deraedt has created an extension you can use to automate the generation of image assets that works similarly to Adobe Generator for Photoshop. You can rename your layers by adding a .jpg, .png, or .svg extension. The Layer Exporter panel exports all your layers to single image assets (see Figure 12).
fig12
Figure 12. Use the Layer Exporter panel to export layers to single image assets.

Export Scalable Vector Graphics (SVG)

Vector graphics enable designers to create icons, symbols, or logos that look great on all screens, including Retina displays. SVG graphics scale well, are usually lightweight, and can be compressed further by web servers.
Check out my article entitled Exporting SVG for the web with Adobe Illustrator CC for more detail.
You can also export SVG files with Illustrator CC by selecting graphics and copying them to the Clipboard. You can then paste the SVG code into your favorite HTML code editor. Edge Reflow CC, for instance, enables you to add an SVG file to your comp by simply copying and pasting the graphics from Illustrator CC into Reflow CC (see Video 5).
Video 5. Copy SVG code from Illustrator CC and paste it into another editor or Edge Reflow CC (no audio).
The most recent addition to Illustrator CC provides the ability to create responsive SVG files. To use this feature, open the More Options section of the SVG Options panel. These graphics, once on your web page, automatically adjust their widths to fill the dimensions of the page. So if you reduce the screen resolution of your website, these graphics will still appear in their entirety. When you export a traditional, nonresponsive SVG file, the width and height parameters are fixed. A responsive SVG file, however, lets the HTML developer set the dimensions, which is why you can easily add them to a responsive layout. For instance, a fluid layout defined in Edge Reflow CC accepts responsive SVG files (see Video 6).
Video 6. Compare classic SVG to responsive SVG used in a responsive page design (no audio).

Understand icon fonts

Symbol fonts (or icon fonts) are popular with web designers because they are:
  • Light and easy to embed
  • Scalable (vector graphics) for use across a variety of screen resolutions and densities
  • Compatible across web browsers, including Internet Explorer 6
As useful and widespread as symbol fonts are, they also have some limitations:
  • Accessibility and SEO need to be addressed outside of this process. On my blog, I show you how ligatures can help solve this problem.
  • Symbols can only have one color.
Check out Icomatic, an innovative online service, to understand how to create symbol fonts from Illustrator CC.

Play with color

Kuler makes it fun to play with colors in Illustrator CC. Use the Kuler extension, or the Kuler website, to import color themes that inspire you and experiment with different color moods while working on your visual design. I also enjoy playing with the Recolor Artwork wheel to try different color themes (see Video 7).
Video 7. Use Kuler to change the color theme of your visual design (no audio).

Design for the web with Illustrator CC

To summarize, Illustrator offers the following benefits for web designers:
  • Responsive web design — With Illustrator CC, you're not limited to a specific resolution. You can create several artboards (one per page) in a single Illustrator file to illustrate how the web page should respond to different screen resolutions. Combined with Edge Reflow CC, Illustrator enables a powerful workflow for responsive web designers.
  • UX prototyping and wireframing — Due to its modular approach to working with text and symbols, Illustrator CC can help increase your productivity as a web designer. The 9-slice scaling mode is a key feature for UI component prototyping and application layouts.
  • SVG and icon fonts — Vector graphics are a necessary component for targeting high-density screens. Illustrator CC is the application to quickly draw vector graphics. The output to SVG is natural and clean.
  • Workflow with web developers — Export clean CSS files from Illustrator CC, and even generate the image assets directly to JPEG, PNG, or SVG format.
  • Flat design — The current trend in web design is clean and minimalistic, and Illustrator provides an ideal environment for drawing shapes and experimenting with colors and web fonts.

Where to go from here

With each iteration of Illustrator CC, web designers can streamline their web design workflow even further. Here are some additional resources for you to explore: